export LANGSMITH_PROJECT=default
```
To send traces to a specific project, use the [`LANGSMITH_PROJECT` environment variable](/langsmith/log-traces-to-project). If this is not set, LangSmith will create a default tracing project automatically on trace ingestion.
You may see these variables referenced as `LANGCHAIN_*` in other places. These are all equivalent, however the best practice is to use `LANGSMITH_TRACING`, `LANGSMITH_API_KEY`, `LANGSMITH_PROJECT`.
The `LANGSMITH_PROJECT` flag is only supported in JS SDK versions >= 0.2.16, use `LANGCHAIN_PROJECT` instead if you are using an older version.
### Trace your LLM calls
The first thing you might want to trace is all your OpenAI calls. After all, this is where the LLM is actually being called, so it is the most important part! We've tried to make this as easy as possible with LangSmith by introducing a dead-simple OpenAI wrapper. All you have to do is modify your code to look something like:
```python Python theme={null}
from openai import OpenAI
from langsmith.wrappers import wrap_openai
openai_client = wrap_openai(OpenAI())
# This is the retriever we will use in RAG
# This is mocked out, but it could be anything we want
def retriever(query: str):
results = ["Harrison worked at Kensho"]
return results
# This is the end-to-end RAG chain.
# It does a retrieval step then calls OpenAI
def rag(question):
docs = retriever(question)
system_message = """Answer the users question using only the provided information below:
{docs}""".format(docs="\n".join(docs))
return openai_client.chat.completions.create(
messages=[
{"role": "system", "content": system_message},
{"role": "user", "content": question},
],
model="gpt-4.1-mini",
)
```
```typescript TypeScript theme={null}
import { OpenAI } from "openai";
import { wrapOpenAI } from "langsmith/wrappers";
const openAIClient = wrapOpenAI(new OpenAI());
// This is the retriever we will use in RAG
// This is mocked out, but it could be anything we want
async function retriever(query: string) {
return ["This is a document"];
}
// This is the end-to-end RAG chain.
// It does a retrieval step then calls OpenAI
async function rag(question: string) {
const docs = await retriever(question);
const systemMessage =
"Answer the users question using only the provided information below:\n\n" +
docs.join("\n");
return await openAIClient.chat.completions.create({
messages: [
{ role: "system", content: systemMessage },
{ role: "user", content: question },
],
model: "gpt-4.1-mini",
});
}
```
Notice how we import `from langsmith.wrappers import wrap_openai` and use it to wrap the OpenAI client (`openai_client = wrap_openai(OpenAI())`).
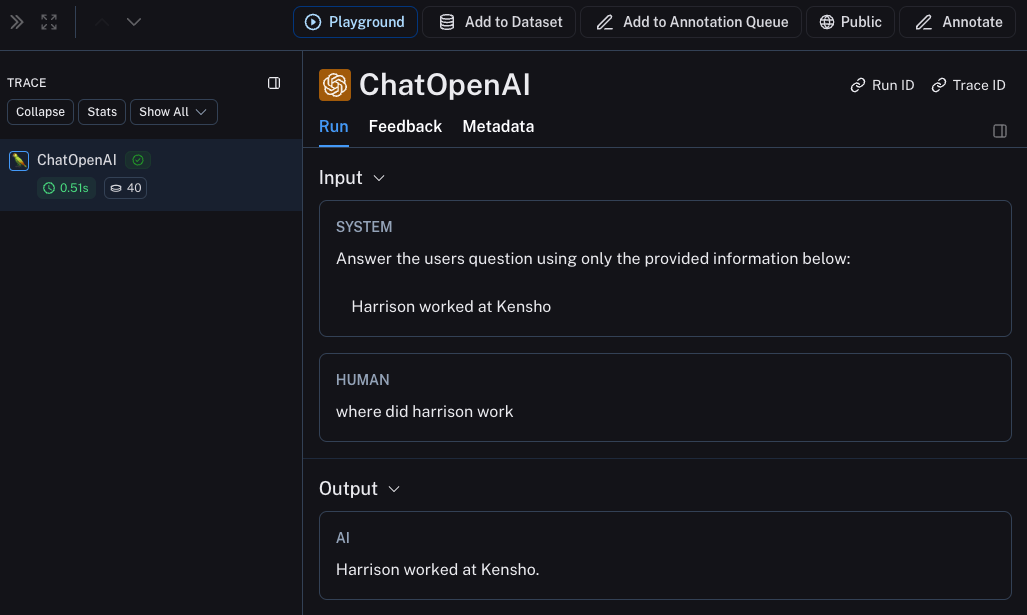
What happens if you call it in the following way?
```python theme={null}
rag("where did harrison work")
```
This will produce a trace of just the OpenAI call - it should look something like [this](https://smith.langchain.com/public/e7b7d256-10fe-4d49-a8d5-36ca8e5af0d2/r)
 ### Trace the whole chain
Great - we've traced the LLM call. But it's often very informative to trace more than that. LangSmith is **built** for tracing the entire LLM pipeline—let's do that! We can do this by modifying the code to now look something like this:
```python Python theme={null}
from openai import OpenAI
from langsmith import traceable
from langsmith.wrappers import wrap_openai
openai_client = wrap_openai(OpenAI())
def retriever(query: str):
results = ["Harrison worked at Kensho"]
return results
@traceable
def rag(question):
docs = retriever(question)
system_message = """Answer the users question using only the provided information below:
{docs}""".format(docs="\n".join(docs))
return openai_client.chat.completions.create(
messages=[
{"role": "system", "content": system_message},
{"role": "user", "content": question},
],
model="gpt-4.1-mini",
)
```
```typescript TypeScript theme={null}
import { OpenAI } from "openai";
import { traceable } from "langsmith/traceable";
import { wrapOpenAI } from "langsmith/wrappers";
const openAIClient = wrapOpenAI(new OpenAI());
async function retriever(query: string) {
return ["This is a document"];
}
const rag = traceable(async function rag(question: string) {
const docs = await retriever(question);
const systemMessage =
"Answer the users question using only the provided information below:\n\n" +
docs.join("\n");
return await openAIClient.chat.completions.create({
messages: [
{ role: "system", content: systemMessage },
{ role: "user", content: question },
],
model: "gpt-4.1-mini",
});
});
```
Notice how we import `from langsmith import traceable` and use it decorate the overall function (`@traceable`).
What happens if you call it in the following way?
```python theme={null}
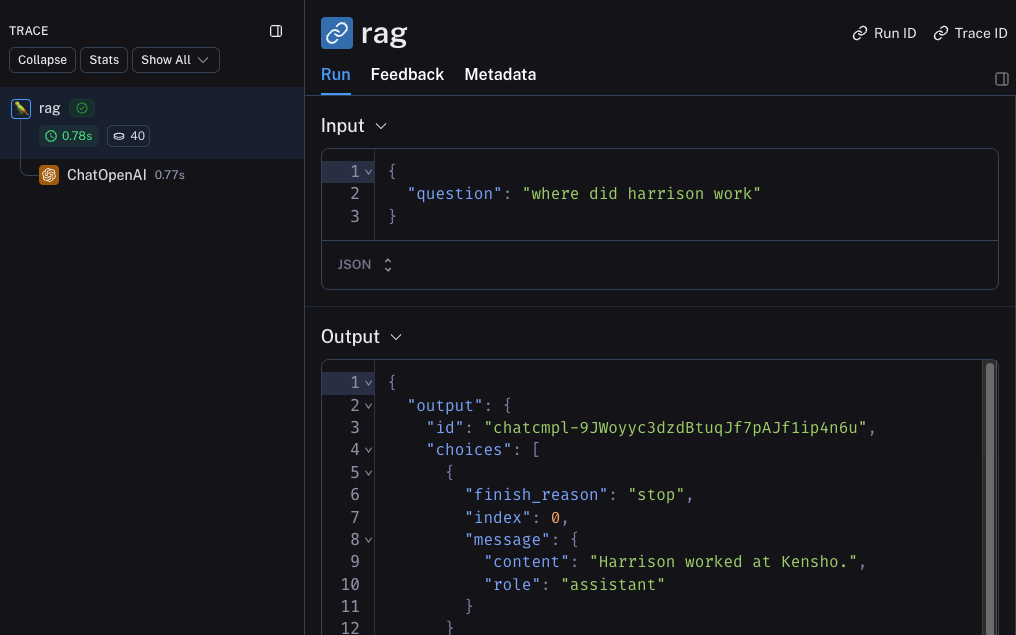
rag("where did harrison work")
```
This will produce a trace of the entire RAG pipeline - it should look something like [this](https://smith.langchain.com/public/8cafba6a-1a6d-4a73-8565-483186f31c29/r)
### Trace the whole chain
Great - we've traced the LLM call. But it's often very informative to trace more than that. LangSmith is **built** for tracing the entire LLM pipeline—let's do that! We can do this by modifying the code to now look something like this:
```python Python theme={null}
from openai import OpenAI
from langsmith import traceable
from langsmith.wrappers import wrap_openai
openai_client = wrap_openai(OpenAI())
def retriever(query: str):
results = ["Harrison worked at Kensho"]
return results
@traceable
def rag(question):
docs = retriever(question)
system_message = """Answer the users question using only the provided information below:
{docs}""".format(docs="\n".join(docs))
return openai_client.chat.completions.create(
messages=[
{"role": "system", "content": system_message},
{"role": "user", "content": question},
],
model="gpt-4.1-mini",
)
```
```typescript TypeScript theme={null}
import { OpenAI } from "openai";
import { traceable } from "langsmith/traceable";
import { wrapOpenAI } from "langsmith/wrappers";
const openAIClient = wrapOpenAI(new OpenAI());
async function retriever(query: string) {
return ["This is a document"];
}
const rag = traceable(async function rag(question: string) {
const docs = await retriever(question);
const systemMessage =
"Answer the users question using only the provided information below:\n\n" +
docs.join("\n");
return await openAIClient.chat.completions.create({
messages: [
{ role: "system", content: systemMessage },
{ role: "user", content: question },
],
model: "gpt-4.1-mini",
});
});
```
Notice how we import `from langsmith import traceable` and use it decorate the overall function (`@traceable`).
What happens if you call it in the following way?
```python theme={null}
rag("where did harrison work")
```
This will produce a trace of the entire RAG pipeline - it should look something like [this](https://smith.langchain.com/public/8cafba6a-1a6d-4a73-8565-483186f31c29/r)
 ## Beta testing
The next stage of LLM application development is beta testing your application. This is when you release it to a few initial users. Having good observability set up here is crucial as often you don't know exactly how users will actually use your application, so this allows you get insights into how they do so. This also means that you probably want to make some changes to your tracing set up to better allow for that. This extends the observability you set up in the previous section
### Collecting feedback
A huge part of having good observability during beta testing is collecting feedback. What feedback you collect is often application specific - but at the very least a simple thumbs up/down is a good start. After logging that feedback, you need to be able to easily associate it with the run that caused that. Luckily LangSmith makes it easy to do that.
First, you need to log the feedback from your app. An easy way to do this is to keep track of a run ID for each run, and then use that to log feedback. Keeping track of the run ID would look something like:
```python theme={null}
from langsmith import uuid7
run_id = str(uuid7())
rag(
"where did harrison work",
langsmith_extra={"run_id": run_id}
)
```
Associating feedback with that run would look something like:
```python theme={null}
from langsmith import Client
ls_client = Client()
ls_client.create_feedback(
run_id,
key="user-score",
score=1.0,
)
```
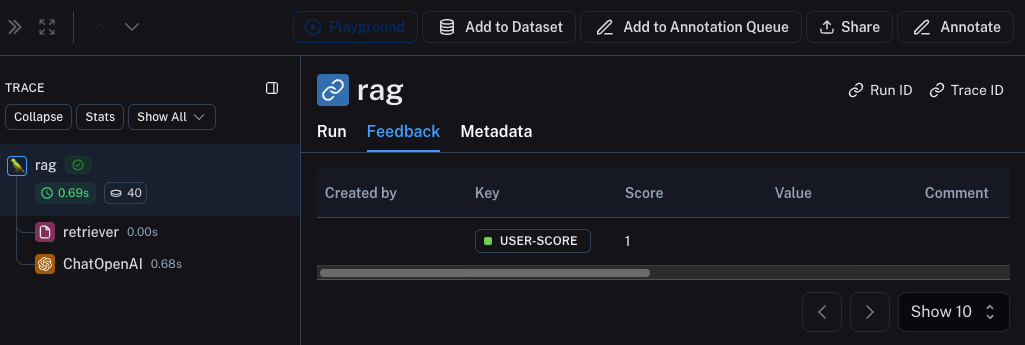
Once the feedback is logged, you can then see it associated with each run by clicking into the `Metadata` tab when inspecting the run. It should look something like [this](https://smith.langchain.com/public/8cafba6a-1a6d-4a73-8565-483186f31c29/r)
## Beta testing
The next stage of LLM application development is beta testing your application. This is when you release it to a few initial users. Having good observability set up here is crucial as often you don't know exactly how users will actually use your application, so this allows you get insights into how they do so. This also means that you probably want to make some changes to your tracing set up to better allow for that. This extends the observability you set up in the previous section
### Collecting feedback
A huge part of having good observability during beta testing is collecting feedback. What feedback you collect is often application specific - but at the very least a simple thumbs up/down is a good start. After logging that feedback, you need to be able to easily associate it with the run that caused that. Luckily LangSmith makes it easy to do that.
First, you need to log the feedback from your app. An easy way to do this is to keep track of a run ID for each run, and then use that to log feedback. Keeping track of the run ID would look something like:
```python theme={null}
from langsmith import uuid7
run_id = str(uuid7())
rag(
"where did harrison work",
langsmith_extra={"run_id": run_id}
)
```
Associating feedback with that run would look something like:
```python theme={null}
from langsmith import Client
ls_client = Client()
ls_client.create_feedback(
run_id,
key="user-score",
score=1.0,
)
```
Once the feedback is logged, you can then see it associated with each run by clicking into the `Metadata` tab when inspecting the run. It should look something like [this](https://smith.langchain.com/public/8cafba6a-1a6d-4a73-8565-483186f31c29/r)
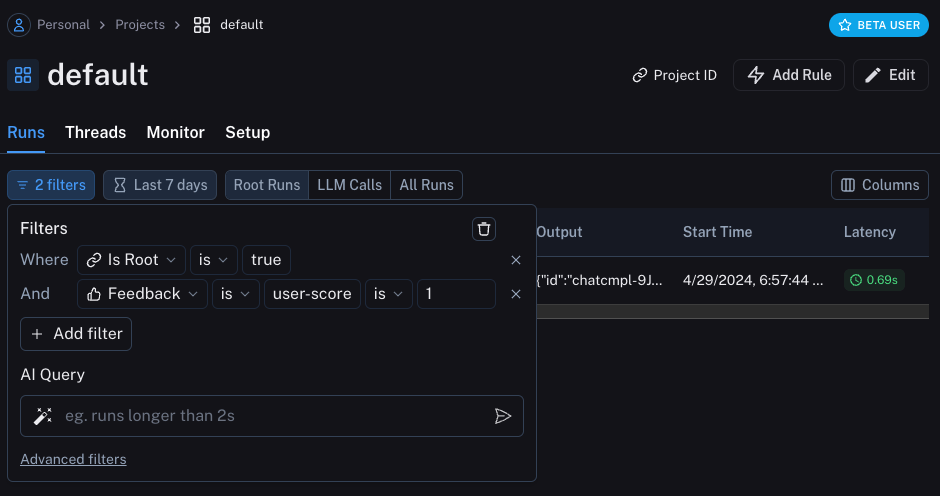
 You can also query for all runs with positive (or negative) feedback by using the filtering logic in the runs table. You can do this by creating a filter like the following:
 ### Logging metadata
It is also a good idea to start logging metadata. This allows you to start keep track of different attributes of your app. This is important in allowing you to know what version or variant of your app was used to produce a given result.
For this example, we will log the LLM used. Oftentimes you may be experimenting with different LLMs, so having that information as metadata can be useful for filtering. In order to do that, we can add it as such:
```python theme={null}
from openai import OpenAI
from langsmith import traceable
from langsmith.wrappers import wrap_openai
openai_client = wrap_openai(OpenAI())
@traceable(run_type="retriever")
def retriever(query: str):
results = ["Harrison worked at Kensho"]
return results
@traceable(metadata={"llm": "gpt-4.1-mini"})
def rag(question):
docs = retriever(question)
system_message = """Answer the users question using only the provided information below:
{docs}""".format(docs='\n'.join(docs))
return openai_client.chat.completions.create(messages = [
{"role": "system", "content": system_message},
{"role": "user", "content": question},
], model="gpt-4.1-mini")
```
Notice we added `@traceable(metadata={"llm": "gpt-4.1-mini"})` to the `rag` function.
Keeping track of metadata in this way assumes that it is known ahead of time. This is fine for LLM types, but less desirable for other types of information - like a User ID. In order to log information that, we can pass it in at run time with the run ID.
```python theme={null}
from langsmith import uuid7
run_id = str(uuid7())
rag(
"where did harrison work",
langsmith_extra={"run_id": run_id, "metadata": {"user_id": "harrison"}}
)
```
Now that we've logged these two pieces of metadata, we should be able to see them both show up in the [tracing tutorial trace UI](https://smith.langchain.com/public/37adf7e5-97aa-42d0-9850-99c0199bddf6/r).
### Logging metadata
It is also a good idea to start logging metadata. This allows you to start keep track of different attributes of your app. This is important in allowing you to know what version or variant of your app was used to produce a given result.
For this example, we will log the LLM used. Oftentimes you may be experimenting with different LLMs, so having that information as metadata can be useful for filtering. In order to do that, we can add it as such:
```python theme={null}
from openai import OpenAI
from langsmith import traceable
from langsmith.wrappers import wrap_openai
openai_client = wrap_openai(OpenAI())
@traceable(run_type="retriever")
def retriever(query: str):
results = ["Harrison worked at Kensho"]
return results
@traceable(metadata={"llm": "gpt-4.1-mini"})
def rag(question):
docs = retriever(question)
system_message = """Answer the users question using only the provided information below:
{docs}""".format(docs='\n'.join(docs))
return openai_client.chat.completions.create(messages = [
{"role": "system", "content": system_message},
{"role": "user", "content": question},
], model="gpt-4.1-mini")
```
Notice we added `@traceable(metadata={"llm": "gpt-4.1-mini"})` to the `rag` function.
Keeping track of metadata in this way assumes that it is known ahead of time. This is fine for LLM types, but less desirable for other types of information - like a User ID. In order to log information that, we can pass it in at run time with the run ID.
```python theme={null}
from langsmith import uuid7
run_id = str(uuid7())
rag(
"where did harrison work",
langsmith_extra={"run_id": run_id, "metadata": {"user_id": "harrison"}}
)
```
Now that we've logged these two pieces of metadata, we should be able to see them both show up in the [tracing tutorial trace UI](https://smith.langchain.com/public/37adf7e5-97aa-42d0-9850-99c0199bddf6/r).
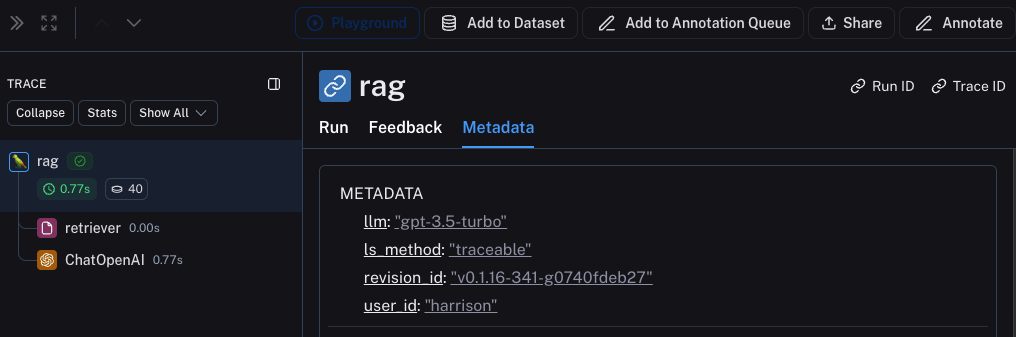 We can filter for these pieces of information by constructing a filter like the following:
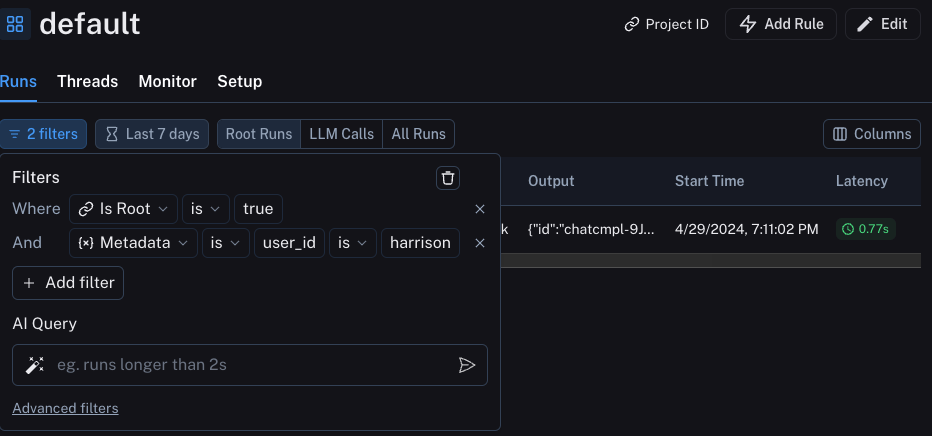 ## Production
Great - you've used this newfound observability to iterate quickly and gain confidence that your app is performing well. Time to ship it to production! What new observability do you need to add?
First of all, let's note that the same observability you've already added will keep on providing value in production. You will continue to be able to drill down into particular runs.
In production you likely have a LOT more traffic. You don't want to be stuck looking at datapoints one at a time. Luckily, LangSmith has a set of tools to help with observability in production.
### Monitoring
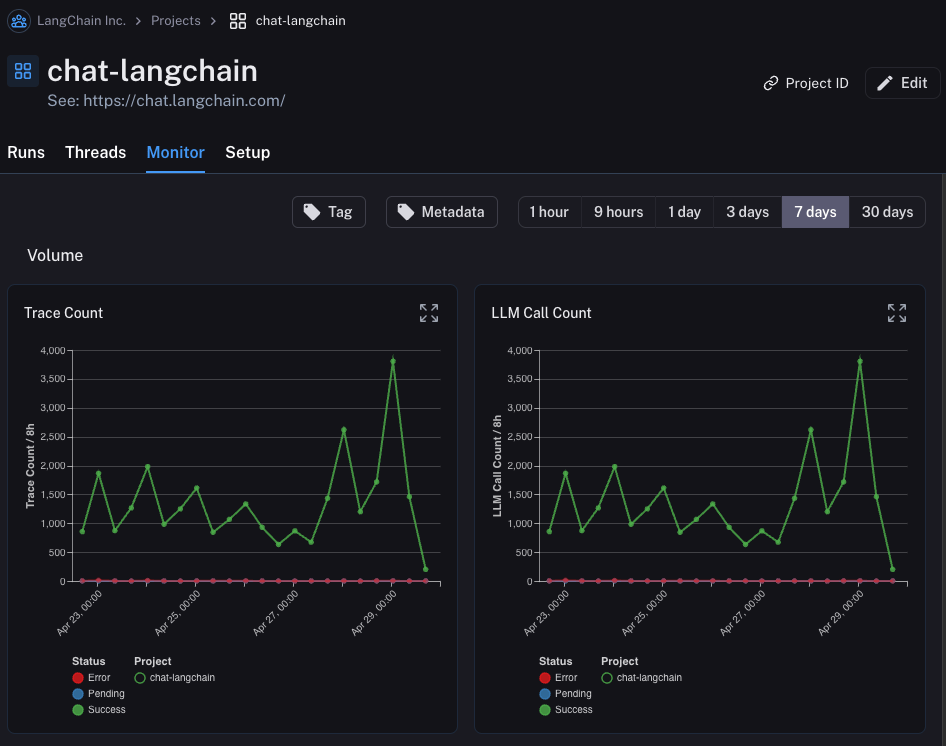
If you click on the `Monitor` tab in a project, you will see a series of monitoring charts. Here we track lots of LLM specific statistics - number of traces, feedback, time-to-first-token, etc. You can view these over time across a few different time bins.
## Production
Great - you've used this newfound observability to iterate quickly and gain confidence that your app is performing well. Time to ship it to production! What new observability do you need to add?
First of all, let's note that the same observability you've already added will keep on providing value in production. You will continue to be able to drill down into particular runs.
In production you likely have a LOT more traffic. You don't want to be stuck looking at datapoints one at a time. Luckily, LangSmith has a set of tools to help with observability in production.
### Monitoring
If you click on the `Monitor` tab in a project, you will see a series of monitoring charts. Here we track lots of LLM specific statistics - number of traces, feedback, time-to-first-token, etc. You can view these over time across a few different time bins.
 ### A/B testing
Group-by functionality for A/B testing requires at least 2 different values to exist for a given metadata key.
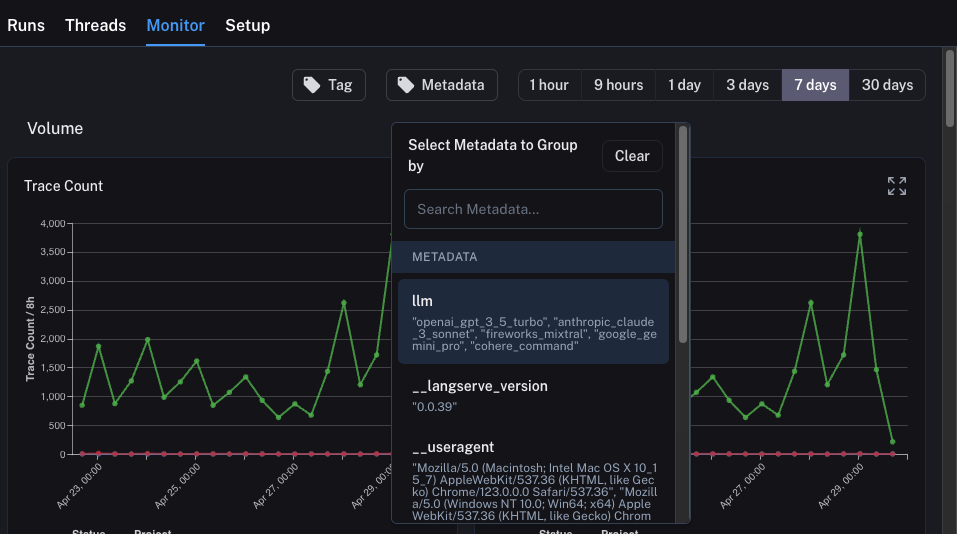
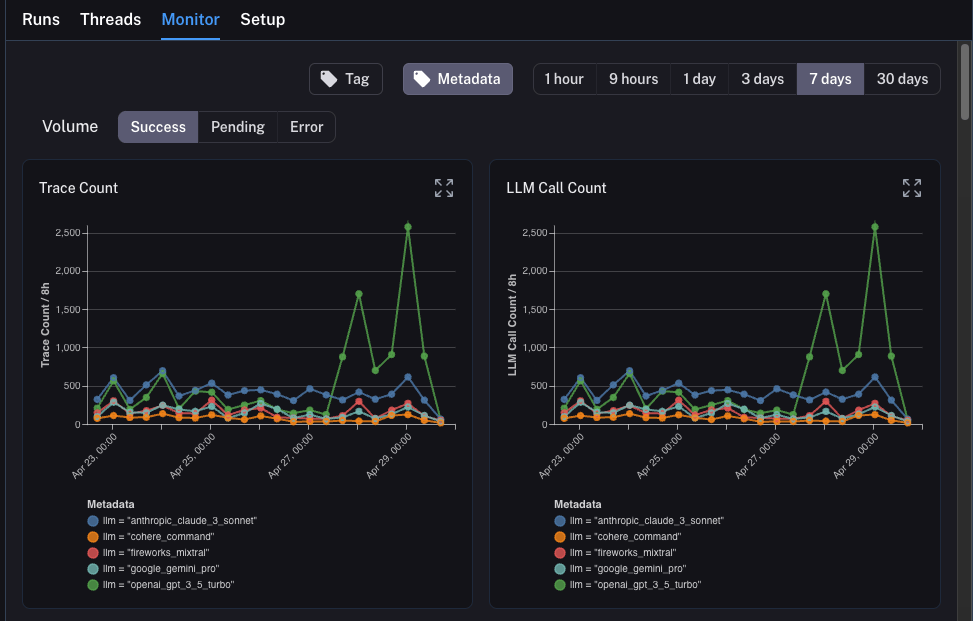
You can also use this tab to perform a version of A/B Testing. In the previous tutorial we starting tracking a few different metadata attributes - one of which was `llm`. We can group the monitoring charts by ANY metadata attribute, and instantly get grouped charts over time. This allows us to experiment with different LLMs (or prompts, or other) and track their performance over time.
In order to do this, we just need to click on the `Metadata` button at the top. This will give us a drop down of options to choose from to group by:
### A/B testing
Group-by functionality for A/B testing requires at least 2 different values to exist for a given metadata key.
You can also use this tab to perform a version of A/B Testing. In the previous tutorial we starting tracking a few different metadata attributes - one of which was `llm`. We can group the monitoring charts by ANY metadata attribute, and instantly get grouped charts over time. This allows us to experiment with different LLMs (or prompts, or other) and track their performance over time.
In order to do this, we just need to click on the `Metadata` button at the top. This will give us a drop down of options to choose from to group by:
 Once we select this, we will start to see charts grouped by this attribute:
 ### Drilldown
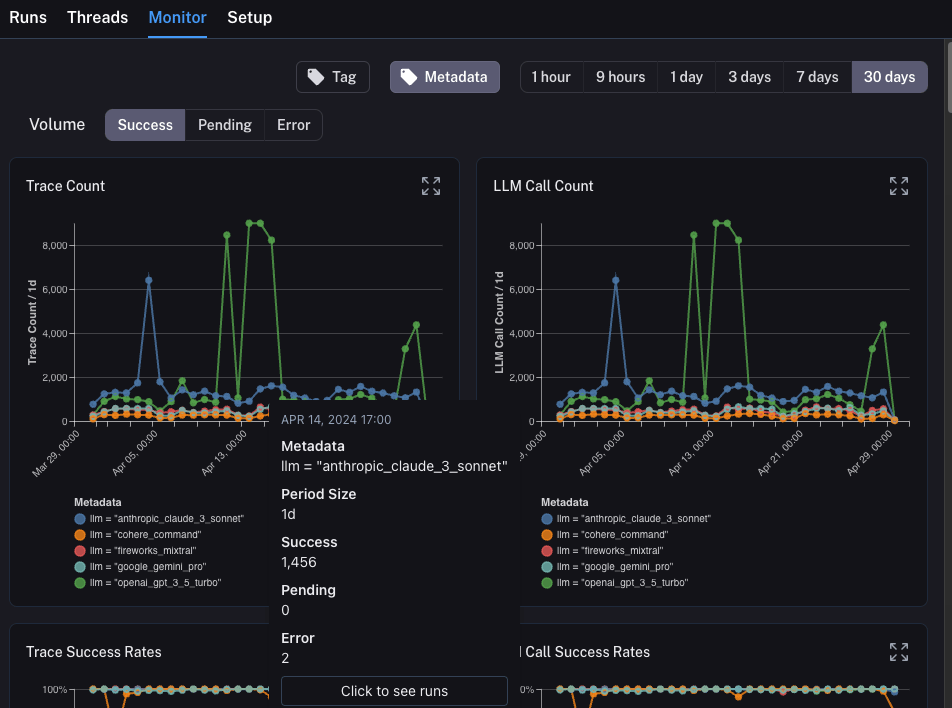
One of the awesome abilities that LangSmith provides is the ability to easily drilldown into datapoints that you identify as problematic while looking at monitoring charts. In order to do this, you can simply hover over a datapoint in the monitoring chart. When you do this, you will be able to click the datapoint. This will lead you back to the runs table with a filtered view:
### Drilldown
One of the awesome abilities that LangSmith provides is the ability to easily drilldown into datapoints that you identify as problematic while looking at monitoring charts. In order to do this, you can simply hover over a datapoint in the monitoring chart. When you do this, you will be able to click the datapoint. This will lead you back to the runs table with a filtered view:
 ## Conclusion
In this tutorial you saw how to set up your LLM application with best-in-class observability. No matter what stage your application is in, you will still benefit from observability.
If you have more in-depth questions about observability, check out the [how-to section](/langsmith/observability-concepts) for guides on topics like testing, prompt management, and more.
***
## Conclusion
In this tutorial you saw how to set up your LLM application with best-in-class observability. No matter what stage your application is in, you will still benefit from observability.
If you have more in-depth questions about observability, check out the [how-to section](/langsmith/observability-concepts) for guides on topics like testing, prompt management, and more.
***
[Edit this page on GitHub](https://github.com/langchain-ai/docs/edit/main/src/langsmith/observability-llm-tutorial.mdx) or [file an issue](https://github.com/langchain-ai/docs/issues/new/choose).
[Connect these docs](/use-these-docs) to Claude, VSCode, and more via MCP for real-time answers.